Game Asset Development Blog - Week 1
Week 1 we were introduced to the project, a group design project based on the game Röki. We went over the basics of group design work, including referencing, idea generation, and which programs to use. We got set up on our Miro board to begin brainstorming, eventually coming up with the idea of a druid-like individual inhabiting a fallen log. I spent a lot of this week getting used to what goes into design and artistic creation, such as the things mentioned above, as I was entirely unfamiliar with every piece of it beforehand.

Week 2


This week we focused on concept art and how to efficiently create concepts to convey and idea without taking up a lot of time. We were also given a small tutorial on Maya UI, and assigned our first prop. As a group we nailed down a stronger idea, and I started on a rough first draft of a cauldron.
I started with a sphere, which I eventually decided would not work as well, and eventually got a vague outer cauldron shape to work from. I followed an online tutorial to figure out how to hollow out the cauldron and make sure the faces and thickness were accurate, then used the soften edge tool to take away the hard visible edges.
I created some simple legs and gave it a random material to finish off. If we end up using a cauldron, I plan to edit it or restart, but for now it is a good start.
Week 4
We had no class for week 3, but received feedback on that Friday. Using that feedback, I worked to improve the cauldron's visible edges by smoothing them to create a rounder shape. At first I thought it might be a problem of moving the edges to specific spots or adding enough to create a more round look, but the feedback showed me the smooth tool which helped a lot.
Before working on the cauldron I also attempted to create a draft of a mushroom as a piece of a forest-y environment, but I focused more on the cauldron to start and as we get more concrete ideas of what each of us will be working on, I doubt I will be focusing back on it. However, being the first prop I ever worked on, it taught some valuable info about starting out with Maya and how to operate in a 3d environment.


Week 5

In week 4 Lucas created a scene to help us size our props correctly, and in week 5 we got a more organized look at what kinds of props we'll be building and who will tackle which, as well as getting used to Codecks and uploading our props there. We also added the props that were just planned and not currently made to the Codecks so that we could assign owners to them, marking who will be working on further props. This helps a lot with organization.
For week 5 I began on the next prop, creating some berries to give our shopkeeper a more varied selection. I liked the process of finding a real life source, and settled on Cloudberries, a type of berry native to Scandinavia with a vibrant orange color. I used image planes to create a backdrop to guide me, and used soft cubes to create the bubbly berry shape.


Week 6
For week 6 I touched up the berries more after working out how to get the colors right, which we did using Incandescence. I added a bit more color variation and detail.
I also created a plate to set the berries on. The berries are fairly large in respect to the plate, because the character and scene are very small and I wanted to show the sense of scale. A small object like a berry being larger than regular would help with that sense.


Week 7

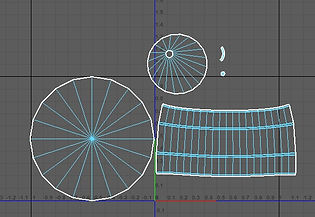
Week 7 we were assigned some tutorial videos and projects for UV Mapping. Being an environment artist, I watched and followed along for the dice, cylinder and the barrel. I followed along fairly well and managed to get most things working first try, although I ordered the dice numbers incorrectly on my first attempt and had to recut and sew the map. The tutorial taught me a lot about the plethora of different capabilities of Maya and necessities of 3d modeling, and should be a good basis should I need to do UV Mapping in the future.


Week 8
Going forward I was tasked with creating some storage crates as well as the counter for the shop. In Week 8 I started on the crates to give some fluff to the scene and make it seem more like a shop environment. I played around with a lot of different shapes and methods of assembling the crates, and wasn't satisfied with my initial work, but eventually I remembered how I hollowed out the cauldron in week 2, and applied a similar method to get a more solid cube shape for the crates, then added some more detail. Ideally I will get these crates a little more stylized later when we have the more important details of the scene figured out


Week 9
In Week 9 I started on the counter. It looked simple in concept, but it was an interesting challenge to get a nice counter with a hollow back where I intended to include a shelf for some convenient storage. I started with the placeholder shelf used for the blockout, as I liked the length and shape. After some tweaking I managed to get a solid shape, then added a little bit of markings similar to other wooden objects around the scene to keep some of the continuity and help it fit better in the scene.


Week 10
Week 10 was the presentation to an industry professional named Holly who was kind enough to receive a pitch from each group and give feedback. During this week we focused on getting our presentation ready. I used my berries for a turntable, although I was unable to obtain Adobe After Effects in time and couldn't use the full turntable in the presentation. It was still useful as a rendered image of my prop, which I did for the cauldron as well. We got to together and recorded the whole presentation rather quickly, using Máté's editing skills which we were very grateful for.
Some of the feedback specific to me mentioned among the general issue of color in our scene was that the berries are little too vibrant and stand out in the scene that we have currently. Additionally, the cauldron's handles are oriented illogically, which I overlooked before. It was also mentioned that I should add some smoldering coals below the cauldron and something brewing inside it, to add somewhat to the centerpiece, which I think could be a cool addition near the end.


Week 11
This week we all focused on using the feedback from the presentations to improve our work. I righted the cauldron's handles and set about changing up the berries to fit a little better and to be a little more gradient, with darker leaves and a deeper orange instead of a more yellow color as before. My grasp on color theory is not as strong as I would like, but ideally the berries fit a little better especially after we made the entire scene in general a little more vibrant and created a more specific color palate. I also created a simple planter box to help Lucas visualize a potential change to the scene that he was working on.


Week 12

The final thing our scene needs worked out is lighting. To facilitate this, the main sources of light were determined (unfortunately deciding against the fairy bottles being sources of light, as it made the lighting very complex and from too many angles) and everyone began working individually on lighting our props in the scene. When everyone has uploaded their work to Codecks, we will put all the pieces together to finalize the project with the doorway that Lucas is working on for this week.
The main objects needing lighting work were the cauldron and crates. It was a challenge through most of this semester to visualize lighting as being the static color of an object, not just an affect on that object, which is one of Röki's most distinctive features. To see that effect come together in our scene was really interesting. I also added some small shadowing to some of the berries, the plate on the table and the till.
The end of the week we got together and went through the final checklist to ensure we would be ready for May 17th.


